$ 0007. Django Basic Architecture to Build Simple Website
| Author | luna-negra |
| Created On | 2024-08-14 10:42:00+00:00 |
| Edited On | 2024-08-14 10:42:00+00:00 |
| Tags | #django #basic architecture #simple website |
I. Preview
Django is a web framework based on python. Like a Java Spring framework which has MVC Model(Model, View, Controller), Django also have a similar structure called MVT(Model-View-Template). So Spring web programmers who learned python, are easily familiar with django. In contrast, you may face to some confusion at the beginning of your learning.
For this reason, I also took a long time to understand how django works and how to create even a simple website. In this post, I just want to show how the django's structure is in a brief form and will create a simple website as an example.
II. Django Architecture - MVT
Most of web-sites are consist of front-end, back-end and storage part. The front-end is a user interface so that it functions as a communicator between server and user. One of the example of the result of front-end is screen on your web-site. On the other hands, back-end is charge of calculation or logical process. So if you send your data with input text or clicking button, server will analyse your demands and work with them. The last thing is storage so-called database section. This part stores the result of data that server produced with client's demands.
Django is designed with MVT model in order to apply these components easily. The term 'MVT' is abbreviation of 'Model, View, Template' and these matches with the components of web-site introduced above.
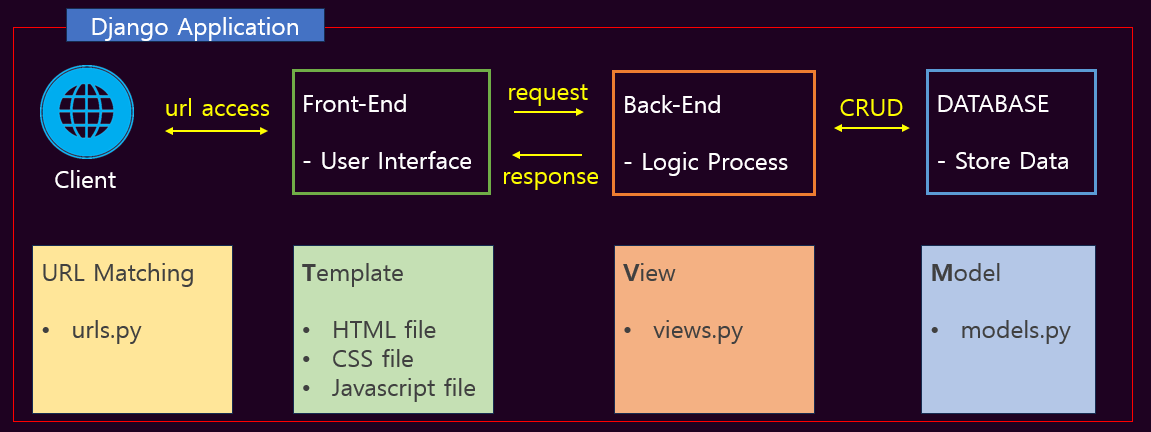
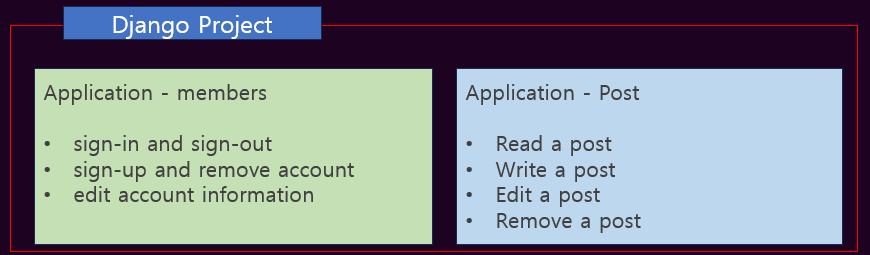
This MVT Pattern compromises one django application and more than one application do a specific work as a module in django. For example, if my website has authentication function to allow members only to read and write a post, my website should have application for members and posts. Each application has a separate database, so it is easy to manage your data.
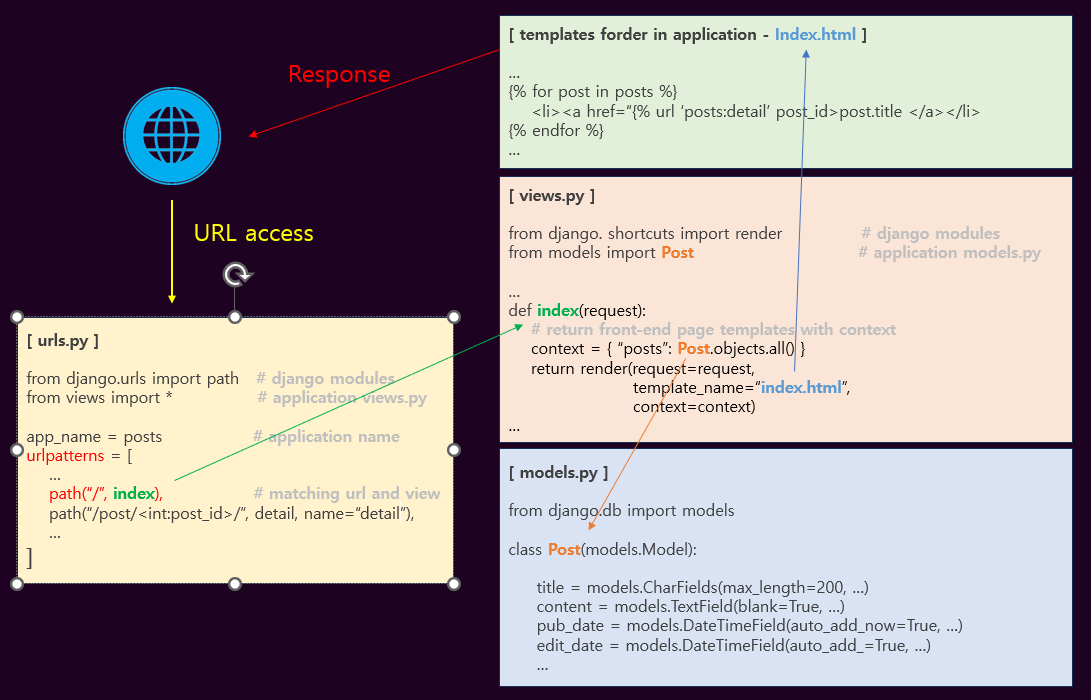
With this architecture, django listen some requests from the client side and return the response like a process below.
At the next section, I just want to show how easily you can create a simple website with django.
III. Create Simple Website
1. Planning and Designing
I just want to create a simple blog website. Everybody can upload their post on my site and read all posts registered. To make this, I have to create database and table for Post and comments.

Next, I will design url and site shape like below.
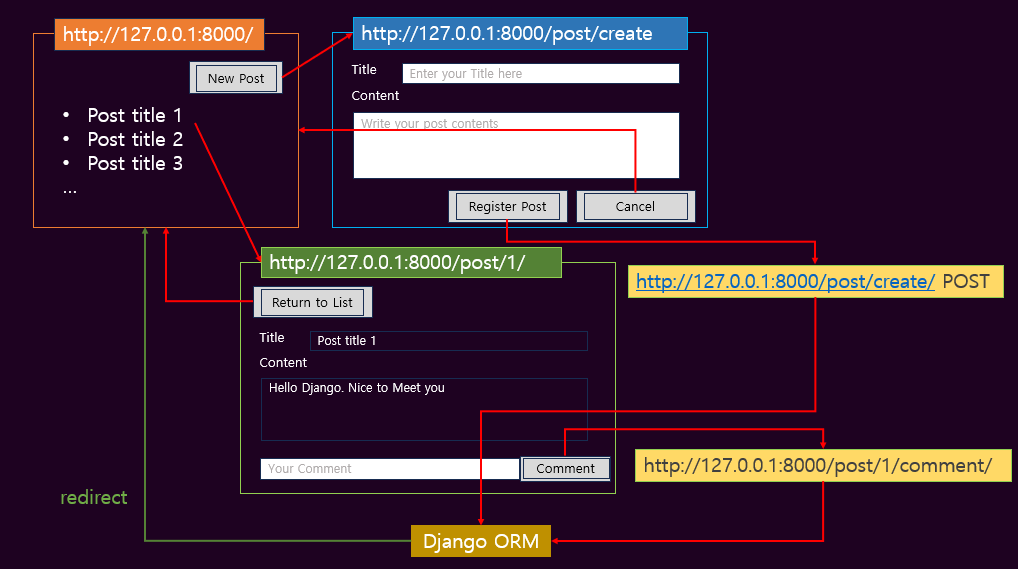
In results, I need two database tables to manage posts and my website will have total 5 urls.
2. Create Django Project and Application ‘posts’
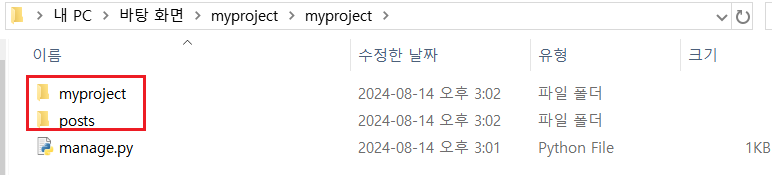
Let me start django development. First I start a django project and create an application 'posts' in that project. After that, you can see folders named 'myproject' and 'posts' in your working directory.
1
2
3
4
5
6
#  : "Create a django project"
#  django-admin startproject myproject
#
#  : "Create an application in Django project"
#  cd myproject
#  python manage.py startapp posts

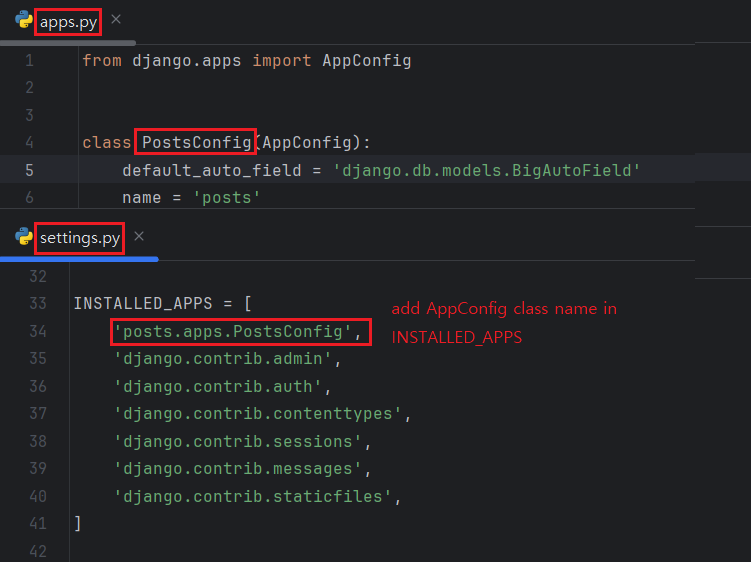
Then, you should tell your django server that you will use application 'posts' will be used in django project. To this, open 'settings.py' file in 'myproject' and add class name wrote down in 'polls/apps.py'.
3. Create models.py
Once you move to the folder 'posts' you can see some python files. One of them is named as models.py and you can create database table with it. As designed above, I will create Posts and Comments class to create database table.
1
2
3
4
5
6
7
8
9
10
11
12
13
14
15
16
17
18
19
20
21
#  : "[ posts/models.py ]"
#
#from django.db import models
#
#
#class Posts(models.Model):
#    title: str = models.CharField(max_length=100, null=False, blank=False)
#    content: str = models.TextField(null=False, blank=False)
#    create_dt: str = models.DateTimeField(auto_now_add=True)
#
#    def __str__(self):
#        return self.title
#
#
#class Comments(models.Model):
#    post: Posts = models.ForeignKey(to=Posts, on_delete=models.CASCADE)
#    text: str = models.CharField(max_length=200, null=False, blank=False)
#
#    def __str__(self):
#        return self.text
#
When you finish writing code in models.py, return to the folder that the 'manage.py' file is located and create tables in real db file with command below.
1
2
3
4
#  : " Migrate models.py to database file."
#  cd ..
#  python manage.py makemigartions
#  python manage.py migrate
#  * 'makemigrations' will check whether your models.py file has syntax error or not.
#  * 'migrate' will create database structure as you designed in models.py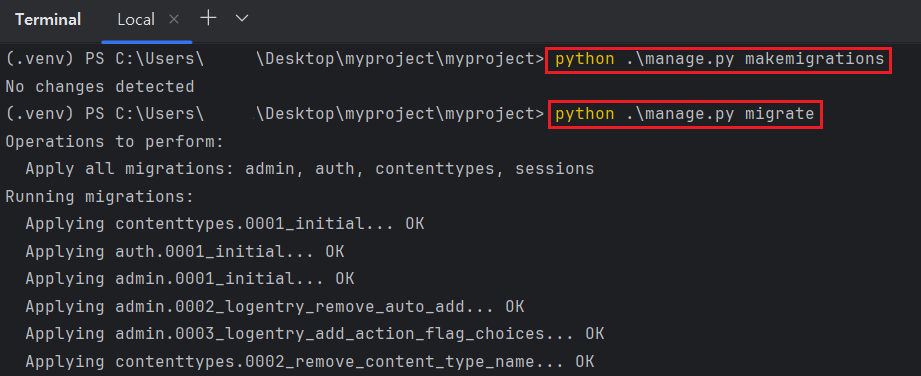
If there is no issue during migration, you can see the database posts are embedded in django's default database file.
1
2
#  : " Check the migration result"
#  python manage.py showmigrations
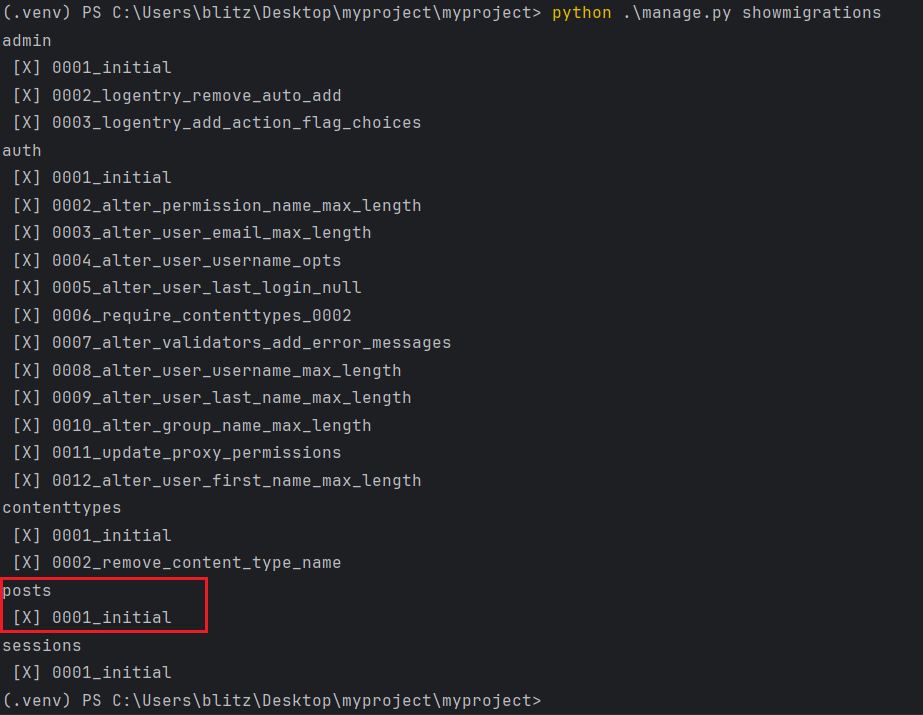
Now you can use the database for your web project.
4. Create views.py
In the folder that models.py file exist, you can also see the views.py file. you can create your own logic for each url. I have to make total 4 views for my website because my web was designed with 4 urls. So my views.py file will have 4 functions.
1
2
3
4
5
6
7
8
9
10
11
12
13
14
15
16
17
18
19
20
21
22
23
24
25
26
27
28
29
30
31
32
33
34
35
36
37
38
39
40
41
42
43
44
45
46
47
48
49
50
51
52
53
54
55
#  : "views.py"
#from django.shortcuts import (render, redirect, HttpResponse)
#from django.views.decorators.http import require_http_methods
#from posts.models import Posts, Comments
#
#
#def index(request) -> HttpResponse:
#    try:
#        context: dict = {"posts": Posts.objects.all() }
#    except Exception as e:
#        context: dict = {"error_message": e}
#
#    return render(request=request,
#                  template_name="index.html,
#                  context=context)
#
#
#@require_http_methods(["GET", "POST"])
#def create(request) -> HttpResponse:
#    if request.method == "GET":
#        return render(request=request,
#                      template_name="detail.html",
#                      context=None)
#
#    title: str = request.POST.get("title")
#    content: str = request.POST.get("content").replace("\n", "<br>")
#    new_post: Posts = Posts(title=title, content=content)
#    new_post.save()
#
#    return redirect(to="/")
#
#
#def detail(request, post_id:int) -> HttpResponse:
#    try:
#        context: dict = {"post": Posts.objects.get(pk=post_id)
#    except Exception as e:
#        context: dict = {"error_message": e}
#
#    return render(request=request,
#                  template_name="detail.html",
#                  context=context)
#
#
#@require_http_methods(["POST"])
#def comment(request, post_id:int) -> HttpResponse:
#    try:
#        post: Posts = Posts.objects.get(pk=post_id)
#    except Exception as e:
#        context: dict = {"error_message": e}
#
#    new_comment: Comments = Comments(post=post, text=request.POST.get("text"))
#    new_comment.save()
#
#    return redirect(to=f"post/{post_id}")
#
In views.py, you can get a values from client's GET/POST communication with variable 'request'. If the page has a form tag and clients send data with it, they are sent as a dictionary form to the 'views.py' file. In contrast, If you want your django server to send response data to the front-end file like html, use 'context' arguments which is provided by render function.
There are some exception codes in my views.py file and these codes will prevent the django from stopping by unexpected error. If there are some exceptions during providing service, django will show its error on the site. Generally, there are more splendid method to handle the exceptions in django, but I will not introduce them in this page.
5. Create urls.py and Matching Views
Next step is the matching urls and views which are created at a previous step. You can find the 'urls.py' file in myproject folder and you make your own urls and mapping it to the application views.
1
2
3
4
5
6
7
8
9
10
11
12
# : "myproject/urls.py"
#
#from django.contrib import admin
#from django.urls import path, include
#from posts import urls as urls_post
#
#
#urlpatterns: list = [
#    path("admin/", admin.site.urls)
#    path("/", include(urls_post))
#]
#
The example above, I tried to include urls.py file from 'posts' folder, but there is no 'urls.py' file, so it will print out error. You can define your urls and map it to the views on this folder but official django documents does not recommend that way due to the high difficulty of managing urls. So, I have to create new urls.py file in the 'posts' folder and fill out the contents like below.
1
2
3
4
5
6
7
8
9
10
11
12
13
14
#  : "posts/urls.py"
#
#from django.urls import path
#from posts.views import (index, create, detail, comment)
#
#
#app_name: str = "posts"
#urlpatterns: list = [
#    path(route="", view=index, name="index"),
#    path(route="post/create/", view=create, name="create"),
#    path(route="post/<int:post_id>/", view=detail, name="detail"),
#    path(route="post/<int:post_id>/comment/", view=comment, name="comment")
#]
#
Now, start the django server with comment below and access the urls that you created. You can access the server but the web browser only show you an error page with 'TemplateDoesNotExist'
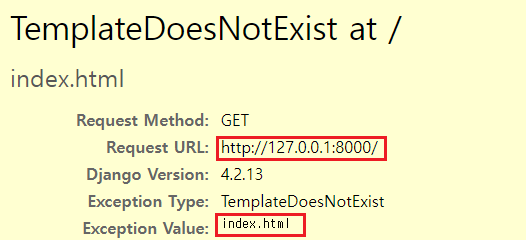
The cause of this error is that your django does not have any html file that all views rendered in views.py. So you should make render page files in a specific file and let the django see that folder to render pages.
First, let the django know the path where it can find html files. Open 'settings.py' file in myproject folder and add folder path to 'TEMPLATES.DIRS'.
1
2
3
4
5
6
7
8
#  : "myproject/settings.py"
#
#  ...
#TEMPLATES = {
#    'BACKEND': 'django.template.backends.django.DjangoTemplates',
#    'DIRS': [ BASE_DIR/"templates", ],
#  ...
#}
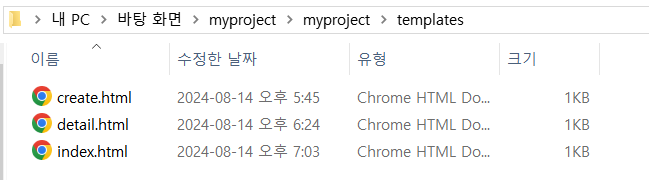
# * BASE_DIR is defined at the upper part of 'settings.py'Then create 'templates' folder at the 'BASE_DIR' and make render html files.
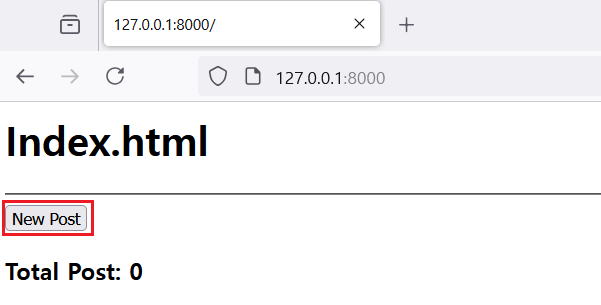
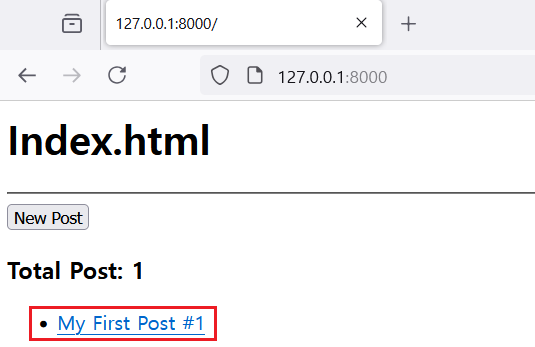
Now, you can see not an error page but the blank page when you access the defined urls. You can fill out the html tag on your html file or decorate them with html
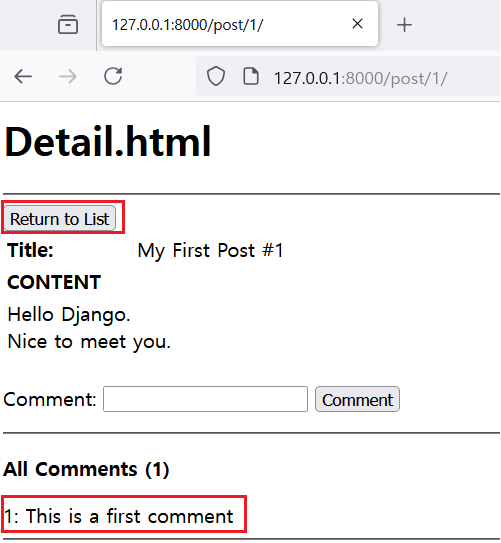
6. Test Functions
If you add some tags on your html file, then check whether the functions work well or not.


IV. References