$ 0006. How to Create Account on a Private Docker Registry
| Author | luna-negra |
| Created On | 2024-08-09 06:00:00+00:00 |
| Edited On | 2024-08-10 13:00:00+00:00 |
| Tags | #docker hub #private registry #authentication #nginx proxy |
I. Preview
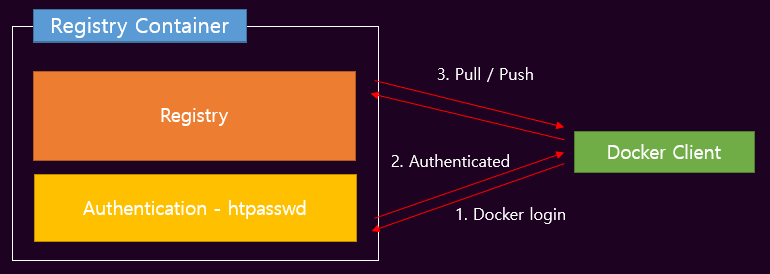
If you create your own docker registry container recently, you maybe start worrying about security. Unless you did not apply TLS on your registry container, everyone can not only pull your docker images but also push unknown images to your registry. This would make your registry vulnerable and unreliable, so you have to come up with some method to prevent unauthorized user from manipulating your own registry.
Even if your registry has a TLS, you do not want to share your work with other person at specific time. For this reason, docker registry provide function for authentication in its own container. In addition, the authentication function is able to be separated from the registry container by using apache or nginx container, so your registry container can concentrate on managing your images only.
II. Set Authentication
There are several methods in order to set an authentication config.
1. Apply HTPASSWD and set environmental variables in a registry container.
2. Split authentication proxy container (Nginx or Apache)

Proxy container uses htpasswd as a default, but you can implement token authentication and replace to the htpasswd. In this post, I will only show the authentication method with htpasswd. All registry examples in this post is regarded that secured by TLS.
If you do not have private and public key for docker, please create it first. These keys should be certified by your root CA or official CA. You can refer to this post to understand and create private and public keys.
1. Native Basic Authentication
First, create a htpasswd file. This file will be created by command 'htpasswd' which is contained apache web server packages. If you can look for it on your host, install 'httpd-tools' (Centos) or 'apache2-utils' (Ubuntu) package.
1
2
3
4
5
#  : "Install 'httpd' - CentOS "
#  sudo dnf install -y httpd-tools
#
#  : "Install 'apache2' - Ubuntu "
#  sudo apt-get install -y apache2-utils
Then, create htpasswd with command below. Please attach option -B to encrypt user password because htpasswd store your password as a base64 encrypted form.
1
2
#  : "Create htpasswd"
#  sudo htpasswd -Bc {filename} {username}
#  * {filename} :  Set the name of auth file created by 'htpasswd' command with option '-c'
#  * {username} :  Type the name of user that you want to use on your registry
#  * You have to contain the option '-B' or the authentication process will not work.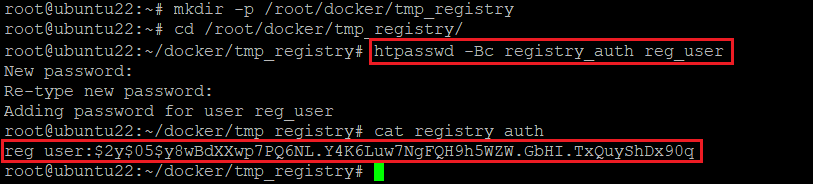
After creating htpasswd file, just run a registry image with --e option to set some environment variables for htpasswd authentication. There are 'REGISTRY_AUTH', 'REGISTRY_AUTH_HTPASSWD_REALM' and 'REGISTRY_AUTH_HTPASSWD_PATH'.
#  * REGISTRY_AUTH: Set a value as 'htpasswd'.
#  * REGISTRY_AUTH_REALM: Set a value as 'Registry Realm'
#  * REGISTRY_AUTH_HTPASSWD_PATH: Set a value as a path of htpasswd file on your registry container.
Let me run registry image with TLS certs and authentication file. Please be advised that my certificate files are located in /root/docker/certs. If you do not want to apply TLS, you do not have to attach options related with TLS.
1
2
3
4
5
6
7
8
9
10
11
12
#  sudo docker run -d --name myregistry --hostname myregistry \
#                  --restart always \
#                  --publish 443:443 \
#                  --volume /root/docker/certs/:/certs/ \
#                  --volume /root/docker/tmp_registry/registry_auth:/auth/registry_auth \
#                  -e REGISTRY_HTTP_ADDR=0.0.0.0:443 \
#                  -e REGISTRY_HTTP_TLS_KEY=/certs/docker_key.pem \
#                  -e REGISTRY_HTTP_TLS_CERTIFICATE=/certs/docker_crt.pem \
#                  -e REGISTRY_AUTH=htpasswd \
#                  -e REGISTRY_AUTH_HTPASSWD_REALM="Registry Realm" \
#                  -e REGISTRY_AUTH_HTPASSWD_PATH=/auth/registry_auth \
#                  registry

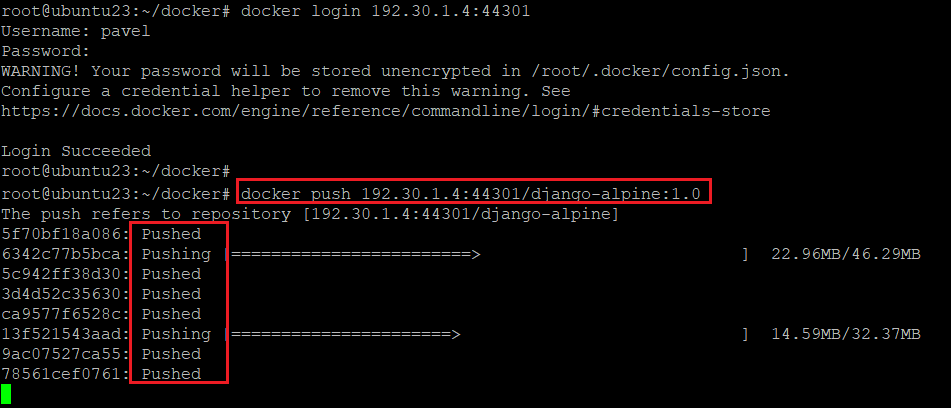
From now on, you have to login to your repository in order to push and pull your images to and from your registry. Do login with a command below.
1
2
#  : "Docker Registry login"
#  sudo docker login {IP_OF_YOUR_DOCKER_HOST_MACHINE}
# If you have an issue with accessing docker, please check your host's firewall setting.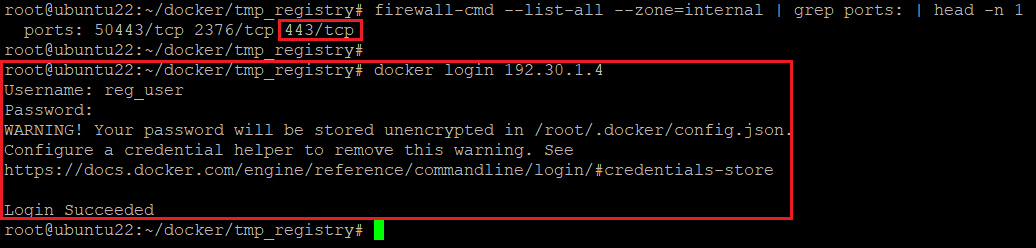
I had no problem with login process, so I can push my own images on my registry. I can see that a pushed image is stored on the container correctly.
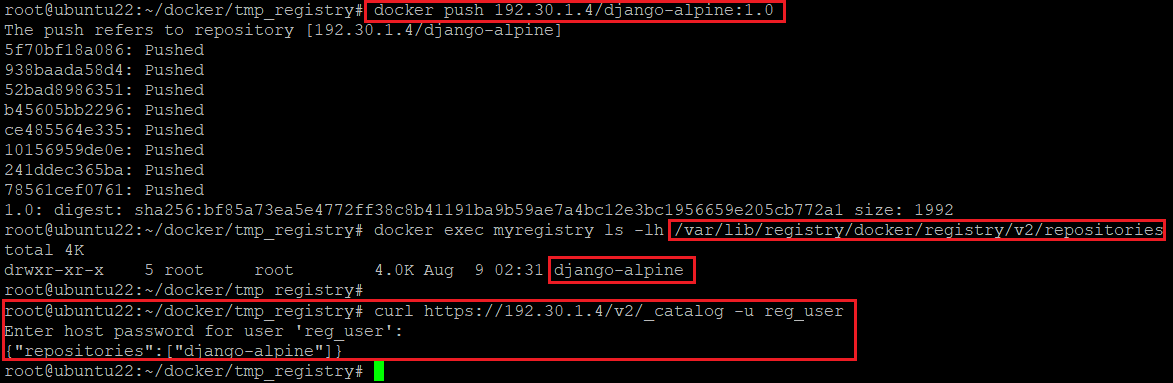
If I logout from my registry, I can not pull and push images and can not also use repository's API.

2. Proxy Server Container with Nginx</a>
It is recommended to allocate each function to one container to ease the handling of the workload and issues of container. Let us assume that there is some problem with authentication process. If you create your registry as a stand-alone, you can not use both registry and authentication service. In contrast, if you separate registry and authentication service, you just look over the authentication container. Even it becomes worse, you can solve this problem just by recreate authentication container.
Before creating architecture, please pull down the nginx image from the official docker hub.
#  : "Pulling down nginx container"
#  sudo docker pull nginx:1.27.0-alpine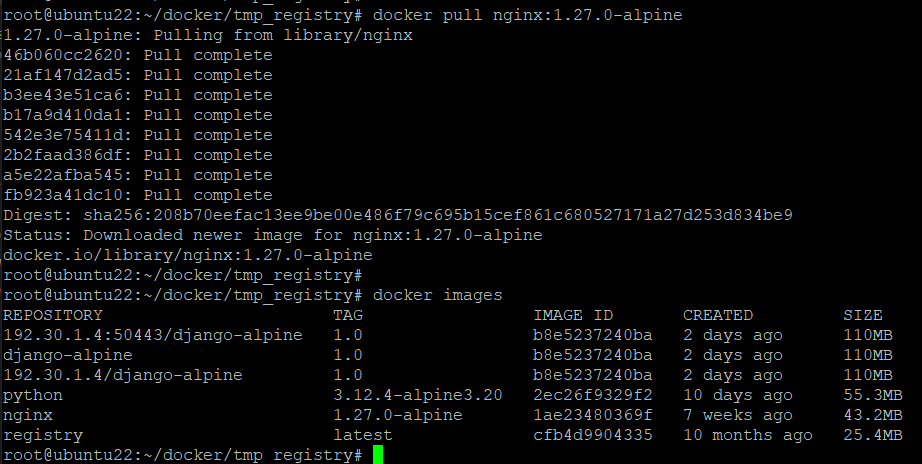
The Nginx container should be a proxy of my registry container, so I have to make a config file for nginx container. Let me name the config file as 'nginx.conf' and locate it at the path where the 'registry_auth' file is located.
1
2
3
4
5
6
7
8
9
10
11
12
13
14
15
16
17
18
19
20
21
22
23
24
25
26
27
28
29
30
31
32
33
34
#  : " nginx.conf "
#  : "worker_processes: set the number of worker processes"
#  worker_processes auto;
#
#  : "events block: set how to handle the connections."
#  : "set the maximum number of simultaneous connection as 16."
#  events {
#    worker_connections 16;
#  }
#
#  : "http block: set the directives for proxy"
#  http {
#    server {
#       listen 443 ssl;
#       server_name 192.30.1.4:
#
#       ssl_certificate /etc/nginx/conf.d/docker_crt.pem;
#       ssl_certificate_key /etc/nginx/conf.d/docker_key.pem;
#       ssl_protocols TLSv1.1 TLSv1.2;
#
#       client_max_body_size 1G;
#
#       location / {
#           auth_basic "Restricted Access";
#           auth_basic_user_file /etc/nginx/registry_auth;
#
#           proxy_pass https://myregistry;
#           proxy_set_header Host $host;
#           proxy_set_header X-Real-IP $remote_addr;
#           proxy_set_header X-Forwarded-For $proxy_add_x_forwarded_for;
#           proxy_set_header X-Forwarded-Proto $Scheme;
#        }
#     }
#  }
#  * I will use nginx to connect to registry with registry's 443 port.
#  * To use 'myregisry' at 'proxy_pass', attach option '--link' will be used when I run the container.
#  * If the size of image is too large, your registry will show the error log 413,
#    which means request entity is too large. To solve this issue, please add 'client_max_body_size 1g;'.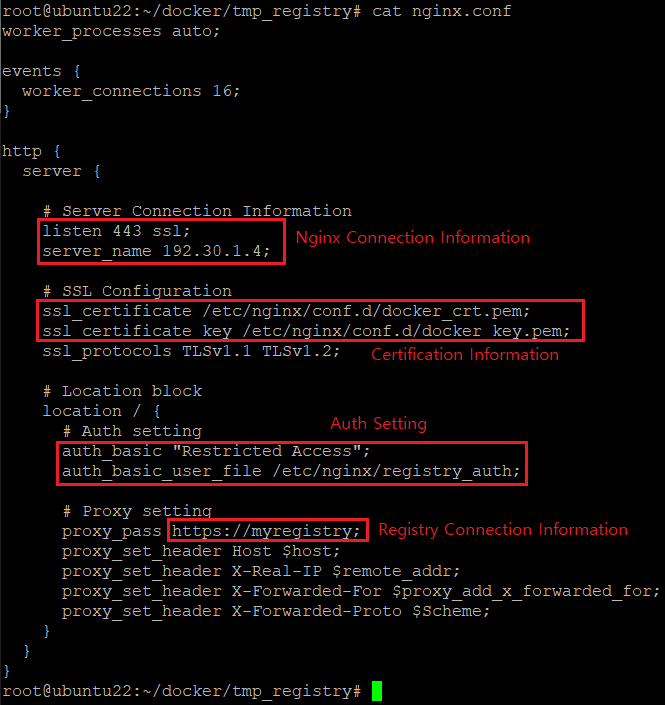
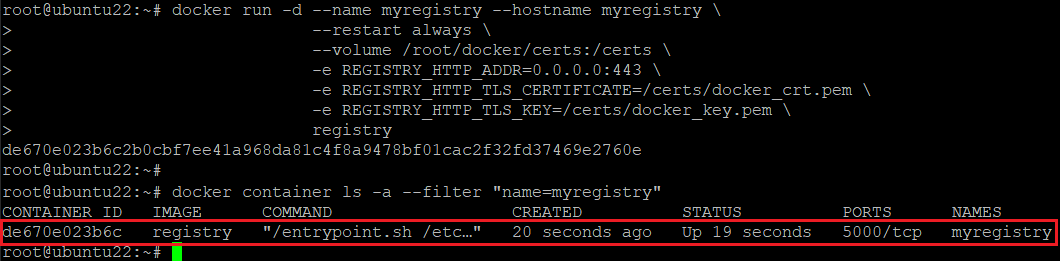
All config files are ready, so I create my private registry first. The registry container does not contain any files related to authentication.
1
2
3
4
5
6
7
8
#  : "Create and run registry container with TLS"
#  sudo docker run -d --name myregistry --hostname myregistry \
#                     --restart always \
#                     --volume /root/docker/certs/:/certs/ \
#                     -e REGISTRY_HTTP_ADDR=0.0.0.0:443 \
#                     -e REGISTRY_HTTP_TLS_CERTIFICATE=/certs/docker_crt.pem \
#                     -e REGISTRY_HTTP_TLS_KEY=/certs/docker_key.pem \
#                     registry
Even though the container runs well, you can not connect to that container with https because the container does not publish any port for NAT. Instead, the nginx will do this work between the registry and a docker client. Let me create nginx proxy container.
1
2
3
4
5
6
7
8
9
#  : "Create and run nginx proxy container"
#  sudo docker run -d --name nginx_auth_proxy --hostname nginx_auth_proxy \
#                     --link myregistry:myregistry \
#                     --publish 192.30.1.4:443:443 \
#                     --volume /root/docker/certs/:/etc/nginx/conf.d \
#                     --volume /root/docker/tmp_registry/registry_auth:/etc/nginx/registry_auth \
#                     --volume /root/docker/tmp_registry/nginx.conf:/etc/nginx/nginx.conf \
#                     --restart always \
#                     nginx:1.27.0-alpine
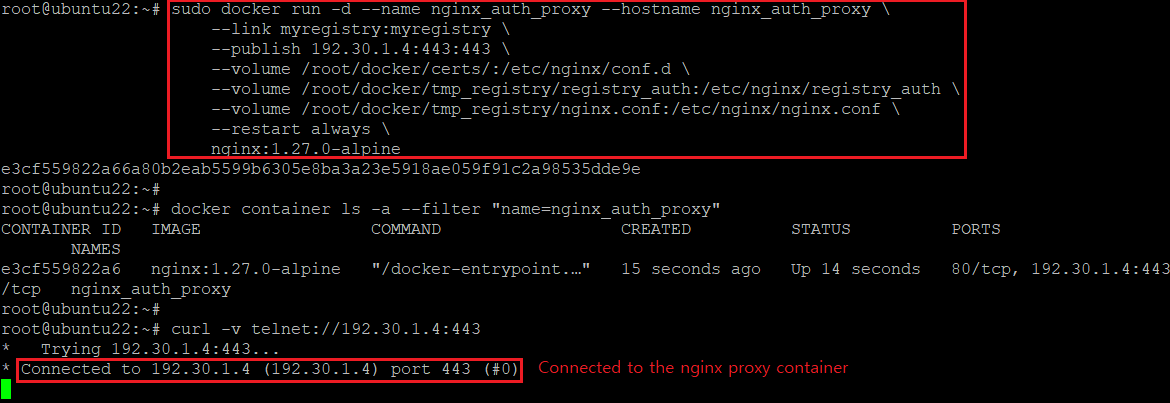
If there is any issue with connecting to the proxy container, you can call the registry API by 'curl' command. Certainely, you have to send account information during calling API.
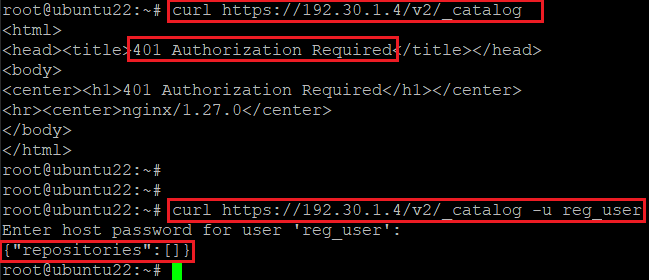
If you can get the result of calling API, you can login to your docker registry. The authentication process is executed by nginx container, so the registry container can ease its workload.
III. Changing TLS Port Number
In the example above, I used default HTTPS port. It could make some collision with web port and some readers of this post want to change TLS port number. However, it has some problem.
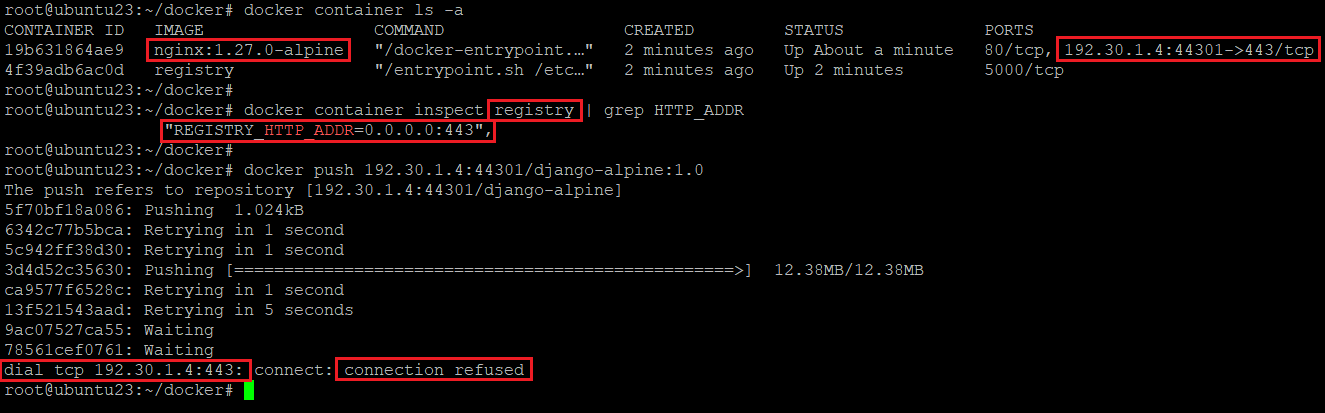
There are issues that docker can not connect to the private TLS port well and only few image layers are uploaded. The reason of this problem is on the Nginx proxy container.
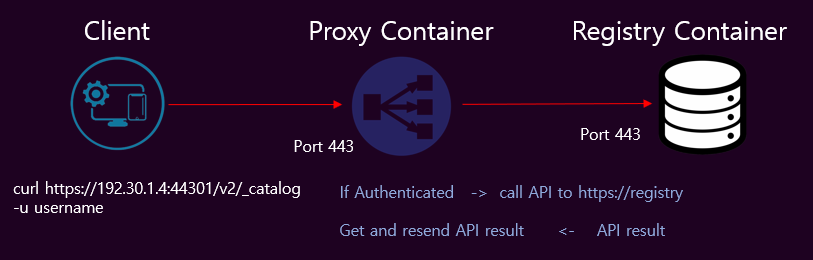
When you just call the registry's API via nginx proxy, nginx proxy do your request with checking authentication. The nginx return the result of API Result after getting the result from the registry.
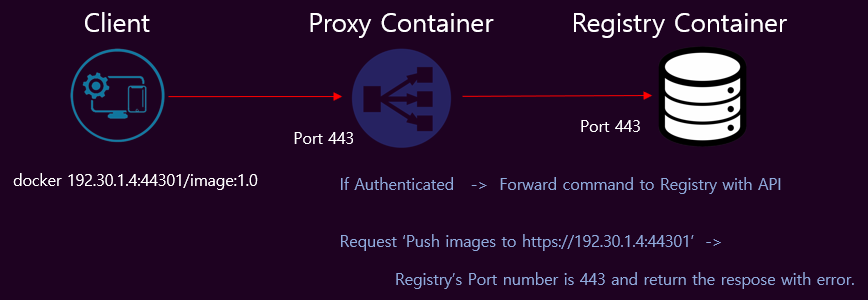
In contrast, pushing and pulling images are quite a different. Once you push your image via nginx, nginx does not change the registry port number in a command to registry's https port. In addition, registry container only listen the incoming traffic via 0.0.0.0:443, so it does not recognise about 'https' protocol.
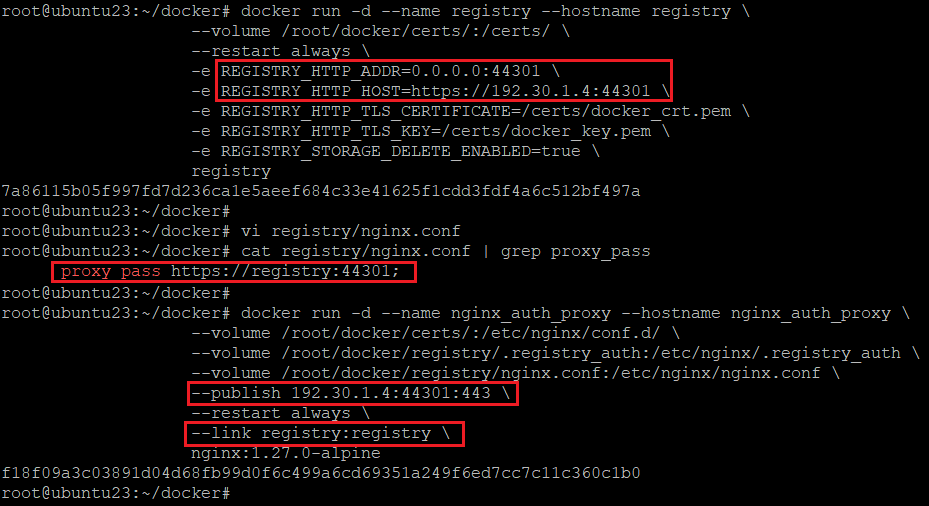
For this reason, we have to do several things to change TLS port on registry when you use proxy server. First, it is crucial to match the registry's TLS port and Docker host's access port number. Second, add environmental variables 'HTTP_HOST' on the registry container and make the registry container recognise the https.
1
2
3
4
5
#  : "Create and run registry container"
#  sudo docker run -d --name registry --hostname registry \
#                     ...
#                     -e REGISTRY_HTTP_HOST=https://192.30.1.4:44301 \
#                     ...
Before running nginx proxy container, do not forget to edit the nginx.conf file.
1
2
3
4
5
6
7
8
9
10
11
#  : " nginx.conf"
#
#  ...
#  http {
#    server {
#           ...
#           proxy_pass https://myregistry:44301;
#           ...
#        }
#     }
#  ...
Now, Let me create and run nginx proxy container with accessing port 44301.
1
2
3
4
5
#  : " Create and run nginx proxy container"
#  sudo docker run -d --name nginx_auth_proxy --hostname nginx_auth_proxy \
#                     ...
#                     --publish 192.30.1.4:44301:443 \
#                     ...
Now, you can push and pull your own image via unknown TLS port.
IV. References
- https://distribution.github.io/distribution/about/deploying/#restricting-access
- https://distribution.github.io/distribution/recipes/nginx/
- https://docs.nginx.com/nginx/admin-guide/basic-functionality/managing-configuration-files/
- https://nginx.org/en/docs/http/ngx_http_core_module.html
- https://github.com/distribution/distribution/issues/2862#issuecomment-571504391