$ 0004. How to Own My Docker Hub Registry with and without TLS
| Author | luna-negra |
| Created On | 2024-07-30 06:18:00+00:00 |
| Edited On | 2024-07-30 06:18:00+00:00 |
| Tags | #docker hub #private registry #applying tls |
I. Preview
Docker provide its official images via its official hub site. You can upload your own image to the docker hub with either private or public mode.
Despite the docker hub site is useful, sometimes you want to make your own hub to store your own images. In this case you might create your hub site on your intra-net which is not connected to the Internet.
However, It is difficult and time-spending to create your own hub site from the scratch. Using web-framework, designing DB and API, authentication and so on... Fortunately, Docker has a private hub container called 'registry' so that we can pull and push our own images without Internet connection. Even though it does not have any web-site for GUI, you can create own hub site by using web framework and registry's API.
In this post, Let me introduce how to make a private docker registry with and without TLS.
II. How to Create Private Registry</a>
Creating docker registry container is very easy. It is finished by pulling registry image from docker official site.
1
2
#  : "Pulling down docker 'registry' image"
#  sudo docker pull registry
Docker registry container uses default port 5000 to pull and push images. Simply create and run the registry image like below.
1
2
3
4
5
#  : "Creating and running registry container"
#  sudo docker run -d --name registry --hostname registry \
#                     --publish 192.30.1.4:5000:5000
#                     --restart always
#                     registry
# * Please note that ip address of my host server is 192.30.1.4. you can replace it to 0.0.0.0Then, you can connect to the host port 5000 with curl.
1
2
#  : "Checking that the host port to registry is open"
#  curl -v telnet://192.30.1.4:5000

However, if you try to push your image to the created repository, there will be an issue related to TLS.

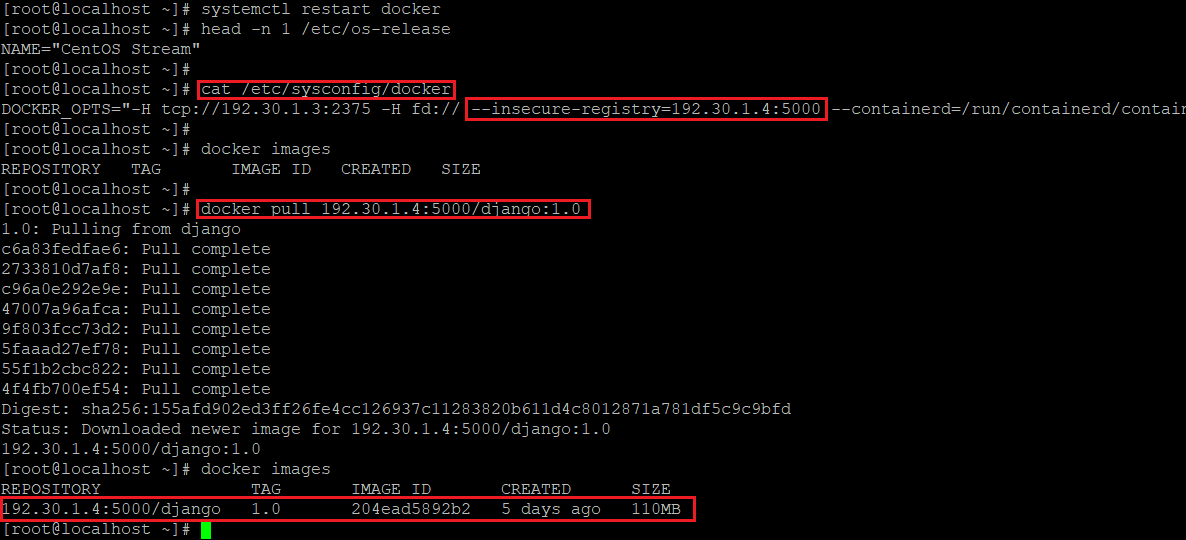
Because Docker only accept TLS communication as a default, so you have to tell the docker server that a specify registry will not use TLS. Open docker config file and add config key 'insecure-registry' and value for registry ip and port. Select one of them below to edit dockerd config.
1
2
3
4
5
6
7
8
9
#  : " Adding a config at file 'daemon.json'"
#  {
#    ...
#    "insecure-registries": ["192.30.1.4:5000"],
#    ...
#  }
#
#  : " Adding a config at file 'docker'
#  DOCKER_OPT= ... --insecure-registry=192.30.1.4:5000 ...
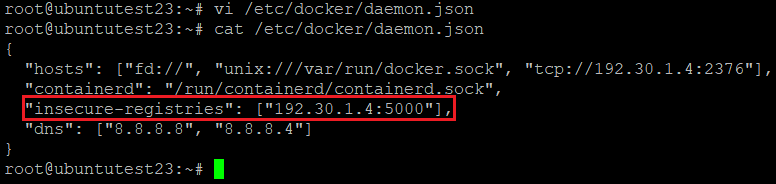
After adding 'insecure-registry', restart docker daemon and try to push your image again.
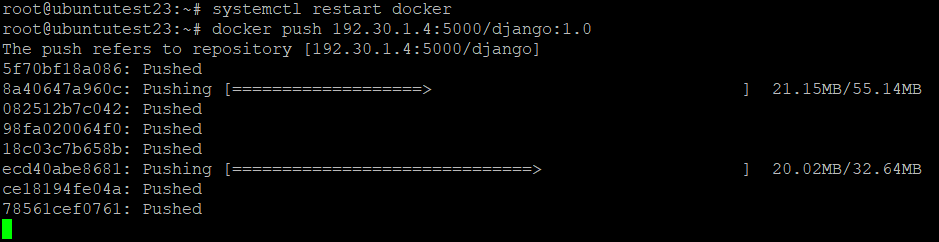
You can also pull the image from your registry if the image you want is stored in the registry.
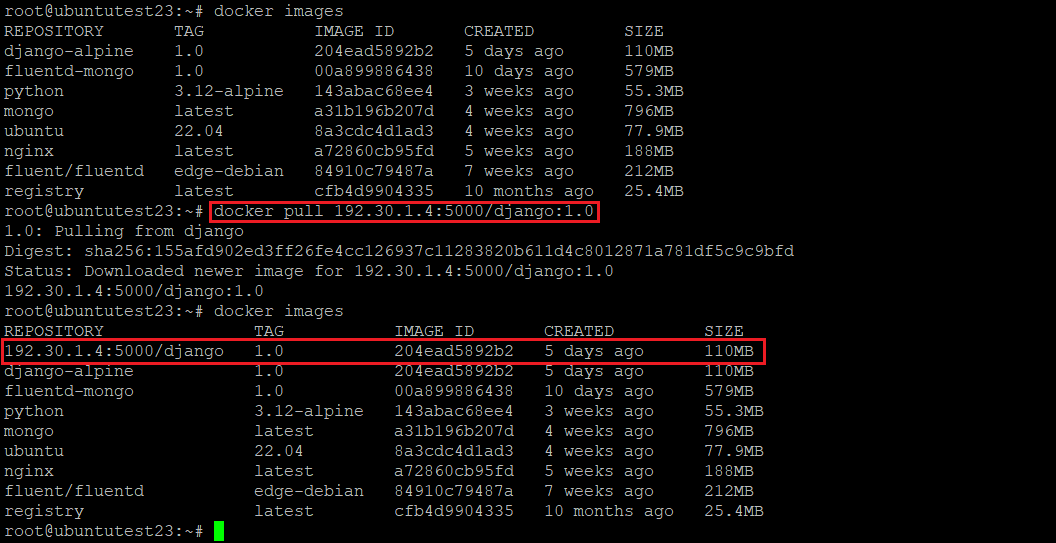
From another remote docker client, images can be downloaded and pushed if the docker configs are correctly set.
III. Security: Apply TLS</a>
1. Create Root CA
Now you can create your own registry, but there is a problem in terms of security. It has any change to be eavesdropped from unknown person because the registry container is not applied TLS.
In this reason, it is more recommended to apply TLS on your private registry. In order to do this, you have to create your own private key and public key(Certificate) for docker daemon.
If you don't have any CA(Certificate Authority) on your server, please create private and public key for CA.
1
2
3
4
5
6
7
8
9
#  : "Creating a new folder to store CA key and certificate"
#  mkdir ~/.cacerts
#  cd ~/.cacerts
#
#  : "Creating a CA key"
#  sudo openssl genrsa -out ca.key 4096
#
#  : "Creating a CA certificate - CA public key"
#  sudo openssl req -x509 -new -days 365 -sha256 -key ca.key -out ca.crt
#  * You have to store ca.crt and ca.key in separate folder and change permission as
#  - sudo chmod 400 ca.key
#  - sudo chmod 444 ca.crt
# * Don't forget to set Common Name as IP address or FQDN of your docker host. 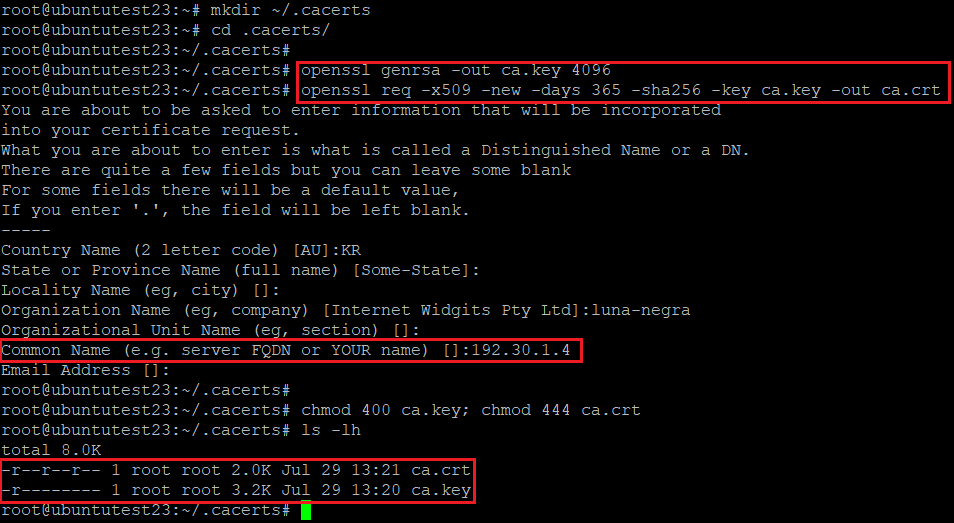
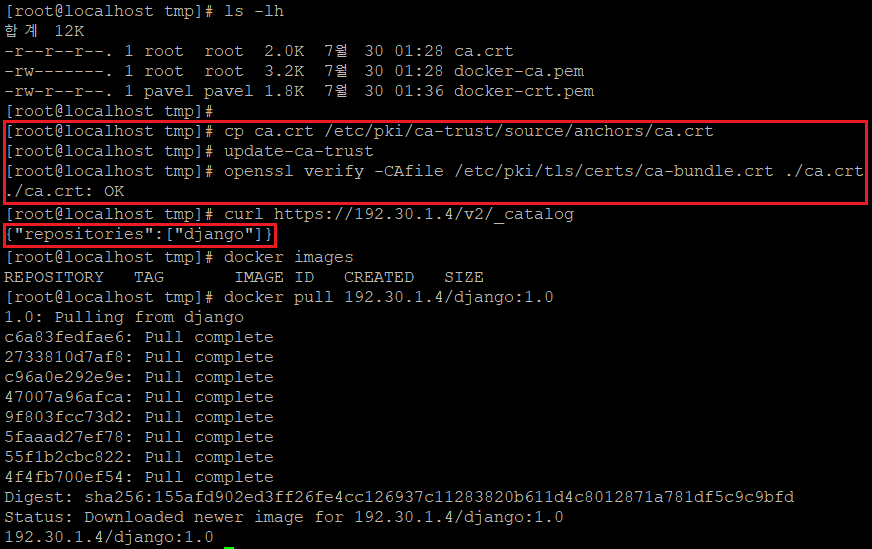
Then, copy the newly created ca.crt to specific folder to register it as CA Certificate on your host.
1
2
3
4
5
6
7
#  : "Register new CA.crt to your host machine - ubuntu"
#  sudo cp ca.crt /usr/local/share/ca-certificate
#  sudo update-ca-certificate
#
#  : "Register new CA.crt to your host machine - centos"
#  sudo cp ca.crt /etc/pki/ca-trust/source/anchors/
#  sudo update-ca-trust

2. Create Docker Key and Certificate for Applying TLS
Now you can make public and private key signed by your root CA. Next docker private key and public key must be created and signed by root CA.
1
2
3
4
5
6
7
8
9
10
11
12
13
14
15
16
17
18
19
#  : "Creating a new private key for docker TLS"
#  sudo openssl genrsa -out docker.key 4096
#
#  : "Creating a CSR(Certificate Signing Request)"
#  sudo openssl req -new -subj "/CN=192.30.1.4" -key docker.key -out docker.csr
#
#  : "Creating extfile.cnf to apply openssl option to create docker.crt"
#  echo "subjectAltName = IP:192.30.1.4"  > extfile.cnf
#
#  : "Creating a new public key for docker registry"
#  sudo openssl x509 -req -sha256 -days 365 \
#                    -CA {LOCATION_OF_ca.crt} \
#                    -CAkey {LOCATION_OF_ca.key} \
#                    -extfile extfile.cnf \
#                    -in docker.csr \
#                    -out docker.crt
#
#  : " Removing unnecessary files"
#  rm extfile.cnf docker.csr
#  *  When you create csr file, please put an option -subj and assign /CN as Common Name at your ca.crt
#  * You have to store ca.crt and ca.key in seperate folder and change permission
#  - chmod 400 docker.key
#  - chmod 444 docker.crt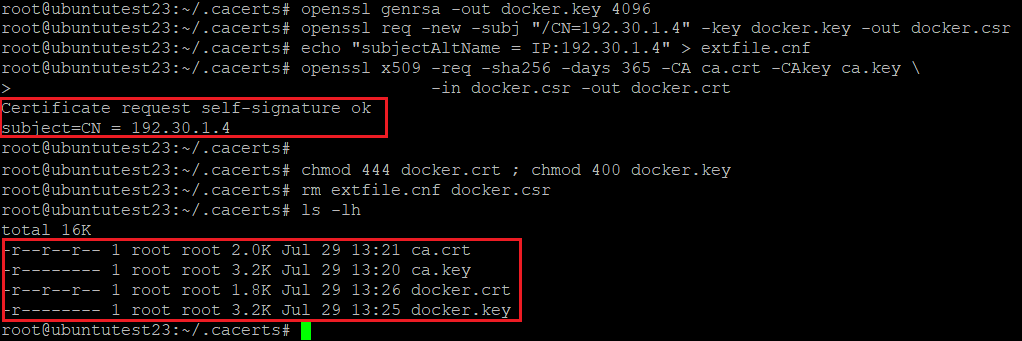
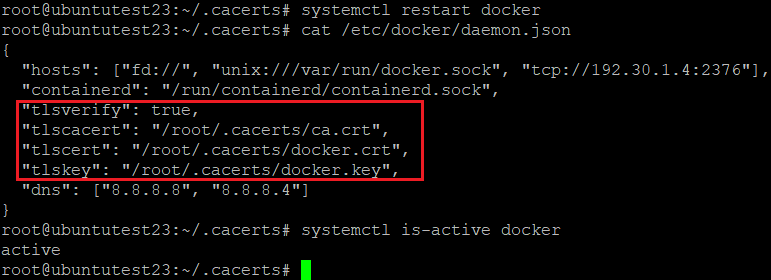
Now it is ready to create docker registry with certificate and key. Before that, docker need to be informed of that containers will be run with TLS. TLS certificate are signed by Host's root CA, so adding flag option for CA information on docker config file is required. Select one of them below.
1
2
3
4
5
6
7
8
9
10
11
12
#  : "edit docker config - daemon.json"
#  {
#    ...
#    "tlsverify": true,
#    "tlscacert": ~/.cacerts/ca.crt,
#    "tlscert": ~/.cacerts/docker.crt,
#    "tlskey": ~/.cacerts/docker.key,
#    ...
#  }
#
#  : "edit docker config - docker"
#  DOCKER_OPT=... --tlsverify --tlscacert=~/.cacerts/ca.crt --tlscert=~/.cacerts/docker.crt --tlskey=~/.cacerts/docker.key    ...
#  * tlsverify:  set tls use or not. default if 'false' [ true / false ]
#  * tlscacerts: CA certification that signing docker key and certificate.
#  * tlscert: docker certificate to use TLS (docker.crt)
#  * tlskey : docker private key to use TLS (docker.key)
After editing config file, restart docker daemon to apply new configs.
If there is any problem. you can create public key and private key for registry TLS.
3. Create Registry Key and Certificate
The next step is creating private key and certificate signed by root CA. They would be used in registry container and only allow TLS communication.
1
2
3
4
5
6
7
8
9
10
11
12
13
14
15
16
#  : "Creating a new private key for docker registry"
#  sudo openssl genrsa -out registry.key 4096
#
#  : "Creating a CSR(Certificate Signing Request)"
#  sudo openssl req -new -subj "/CN=192.30.1.4" -key registry.key -out registry.csr
#
#  : "Creating extfile.cnf to apply openssl option to create registry.crt"
#  echo "subjectAltName = IP:192.30.1.4"  > extfile.cnf
#
#  : "Creating a new public key for docker registry"
#  sudo openssl x509 -req -sha256 -days 365 \
#                    -CA {LOCATION_OF_ca.crt} \
#                    -CAkey {LOCATION_OF_ca.key} \
#                    -extfile extfile.cnf \
#                    -in registry.csr \
#                    -out registry.crt
#  *  When you create csr file, please put an option -subj and assign /CN as Common Name at your ca.crt
#  * You have to store ca.crt and ca.key in seperate folder and change permission
#  - chmod 400 docker.key
#  - chmod 444 docker.crt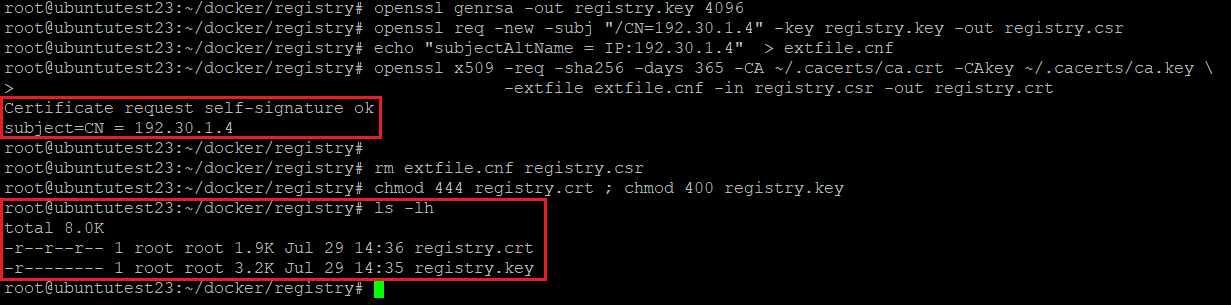
4. Run TLS registry and Test
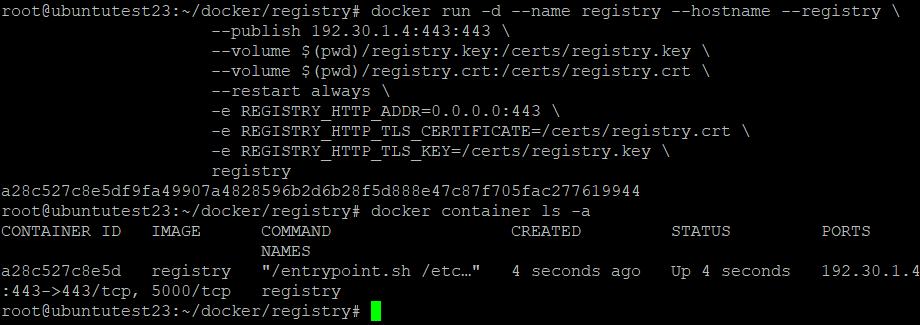
With registry.key and registry.crt, let me create and run registry container. To apply TLS, registry container must have some environmental variables.
1
2
3
4
5
6
7
8
9
10
#  : " Creating and running registry container"
#  sudo docker run -d --name registry --hostname --registry \
#                     --publish 192.30.1.4:443:443 \
#                     --volume $(pwd)/registry.key:/certs/registry.key \
#                     --volume $(pwd)/registry.crt:/certs/registry.crt \
#                     --restart always \
#                     -e REGISTRY_HTTP_ADDR=0.0.0.0:443 \
#                     -e REGISTRY_HTTP_TLS_CERTIFICATE=/certs/registry.crt \
#                     -e REGISTRY_HTTP_TLS_KEY=/certs/registry.key \
#                     registry
If the registry container has no issue, let me check the port open and communication
1
2
3
4
5
#  : "Checking Port Open"
#  curl -v telnet://192.30.1.4:443
#
#  : "Checking Registry's API"
#  curl https://192.30.1.4/v2/_catalog
# * https://192.30.1.4/v2/_catalog returns a list of stored images in json format.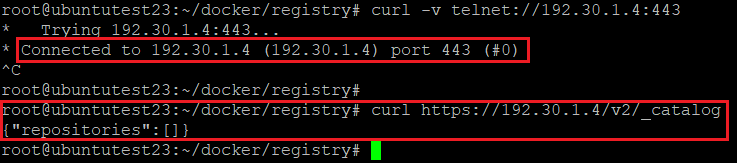
Now, you can upload your images to private registry which is applied TLS unless there are any issue related to HTTPS.
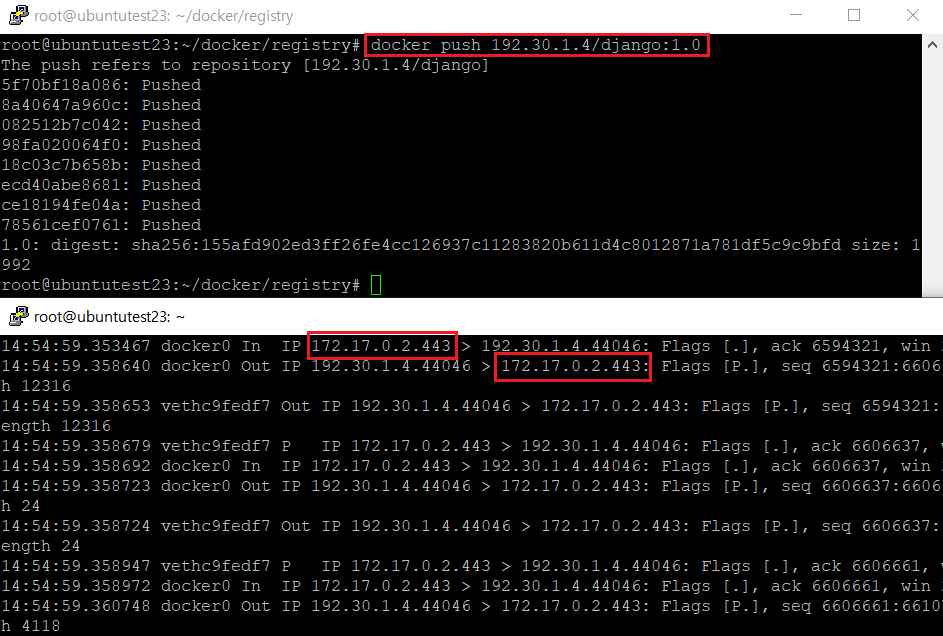
Even if somebody eavesdrop communication, data will not be shown due to the encryption.
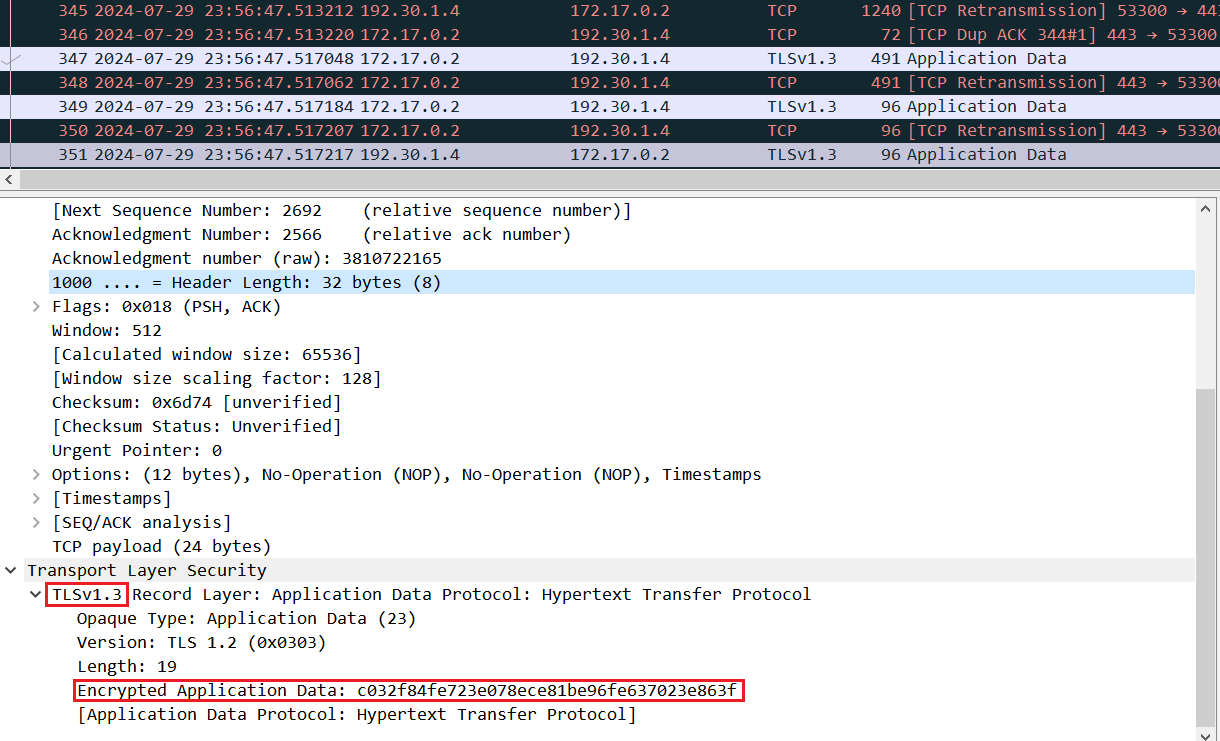
In addition, another host machine without proper certificate and key, will not push images to the private registry or pull from it.
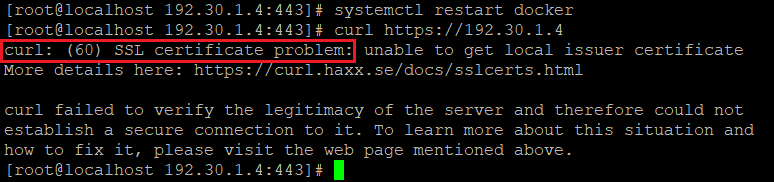
If you want to access TLS registry from the remote, you must have root CA certificate on the remote machine and register it as a trust certificate.
IV. References
- https://docs.docker.com/engine/security/protect-access/#use-tls-https-to-protect-the-docker-daemon-socket
- https://stackoverflow.com/questions/63433936/what-is-serverauth-and-clientauth#:~:text=clientAuth%20means%20it%20can%20be,1.12%20Extended%20Key%20Usage.
- https://stackoverflow.com/questions/66878538/how-to-secure-docker-client-connection-by-default
- https://distribution.github.io/distribution/about/deploying/#get-a-certificate
- https://distribution.github.io/distribution/about/insecure/